Showing posts with label exteriors. Show all posts

6.30.2010

How They've Grown...


It has been a year since I planted my Confederate Jasmine. My dream is to have my porch columns be completely covered in the fragrant beauties. Last year they were barely scraping the base of the columns...


But after 365 days of water and sun they have met in the middle and are going strong!


I hope Erik and I are in this house long enough to see them mature like these that I saw on a trip to Serenbe- a beautiful neighborhood in South GA.


Have anything good growing at home?


8.11.2009

Favorite Combo: Grass + Lantana


Here is our whiskey barrel full of purple fountain grass and white lantana. It is the perfect combo for height, color, and trailing plants. Both of these plants prefer bright, full sun so they are thriving in the back of the house. I'll probably spend the weekend out in the yard dividing MORE lamb's ear. The stuff just won't stop growing!...

7.14.2009

New Vines a growing...


{ from here }


I adore the look of lush, green living accents to homes. An ivy covered wall, or a wisteria engulfed archway. Our little craftsman neighborhood is seriously lacking greenery. We are one of the lucky few who have a tree in the front yard, but I want more. I wanted to have a statement entry to our abode, so Erik finally agreed to let me grow one!


I purchased these amazing smelling Madison Jasmine vines a couple weeks ago. I have them planted and primed to climb up and cover two pillars that frame our front porch. They have done some serious sprouting due to a few good rains. I can't wait for the green accent to the porch! I'll keep you updated on the climb!

7.09.2009

Curtain How-To


Outdoor curtains are EXPENSIVE I have learned. Most run about $40-50 for a panel which, when I needed 4 for the deck, was out of the question. This is how it came to be that I make my own. That's usually how I end up doing most of the projects I do- I see what it costs to buy outright, I am astonished, I then make my own. Some people call it crafty, I say that I'm just cheap.

I searched online and found a site that sold outdoor fabric and found the white I wanted. (I'm not posting a link because I didn't have the best buying experience and I don't want others to have one either- use Google people!) I ordered 12 yards to make 4 panels that measured 88" after hems. I had to roll out the fabric on my bedroom floor to cut the panels. I added 6" (a 1/2" top and bottom flap, and 4" top seam, and 1" bottom seam) to the 88" for a total of 94" raw material. Then hemmed the top and bottom per the specs. Now why a 4" top seam you ask? Because I decided to use grommets to hang the curtains.

I found these awesome plastic grommets from Joann's that were perfect. Plastic so they wouldn't rust and there were a bunch of finishes to choose from. The directions said that a 4" seam worked best.


**Note: Always check specs for hardware before in case they ask for things like this!**

Next I measured out the placement for the grommets. With 6 per panel they worked out to be 7 1/2" apart. I then marked the center of the grommets and used the included stencil to make cutting guidelines. So easy!


Then I carefully cut out the centers and put the two plastic grommets one on top one on the bottom and they simply snapped together. The greatest grommets ever!


Once all the curtains were finished, Erik hung the 1" dowel rods, that I stained to match the porch, and I put up the new crisp, white panels. I also made tie-backs with extra fabric and tinier versions of the same grommets.


Now we have all the privacy we need, along with a cabana feel of the beach, nice.


7.06.2009

Happy Dance!


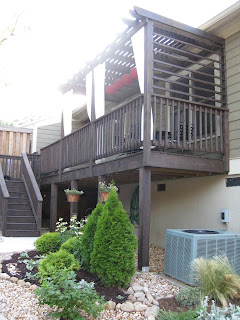
Here is our NEW and IMPROVED back porch with pergola in all its glory...


It has been a long labor of love that included 5 days of staining, 2 days of construction, 1 day of sewing and 1 day of landscaping. But it was all worth it when our 4th of July guests enjoyed the extra shade and comfy spot to eat and mingle.

I still would like to add some greenery on the porch and Erik hopes to get a couple benches made for extra seating. But all in all, it wasn't a difficult project, just a time consuming one. Remember what it looked like...

Before:


{ So hot and sunny...}


During:


All of it was necessary to achieve the amazing after:


Thank you to everyone who helped it all come together!!


I'll have an easy as pie tutorial to show you how I whipped up those awesome outdoor curtains so easily!

6.23.2009

Progress on the Home-Back


{NO MORE projects, PLEASE! }


It was another scorching day in Georgia and a productive day at the Grubbs' house. Today I had the wonderful hands of my mother in law to help! Mission: Pergola is moving along. Erik and I have decided that we are going to stain the ENTIRE back porch and pergola the same cocoa brown that we used on the front porch. It is going to be a huge job but we know that we would always look back thinking we should have done it. So since I am wonderfully employed as a teacher and still have about 5 weeks of summer vacation I decided to start tackling the massive job.

I started by staining all the new wood since it was already nice and clean.


Today Anita (mom-in-law) came over with her trusty pressure washer. So I went to town on getting the grime of the old wood to prep for stain. While I did that, she worked on staining the top planks for the pergola. It will be easier to stain them now, instead of trying to reach all the nooks when they are already installed.


{ I love this stain color, Oxford Brown by Behr. It looks worn and weathered, perfect.}


By about 4p we were spent and ready to go inside and enjoy the AC. I'm sure I'll have a brush back in my hand very soon- but I'm taking the day off tomorrow.

6.20.2009

Simple Update


I must share my favorite tool when it comes to yard work: THE COIL HOSE! It is amazing, especially since we have to drape our hose over a railing to reach all of our plants. The standard hose just kept getting tangled and would break the limbs of a hydrangea near by. Target to the rescue! We got a 50' hose with a multi-head sprayer for $19.99!

But I was using a nasty old plastic pot to hold the old hose. A score from my mother-in-law- a coil basket, for free!!- was a must have. I spray painted it white because it already had some paint drips on it.


And now my new lovely hose has a lovely house to match!


Yay for easy, free fixes!

6.19.2009

Growing Away


It's going to be a scorcher here in GA today, 97 degrees! I hope all these new blooms can take it!


Can you tell I like white flowers?

6.16.2009

New Porch Accessories


The front porch needs love too! We have been, and will be, spending so much time working on our back porch that I wanted to show some love to the front as well. Our teak furniture was looking very gray and sad after a long winter, so I got some teak oil and gave all of it a nice new sheen.


{ Doc is very sleepy on the freshened up porch furniture. }


I also had to change out my little boxwood shrubs from my planters- they fell victim to squirrels who were insistent on hiding their nuts in the planters. I replaced the shrubs with these gorgeous Glory Blue Hydrangeas and some vinca. I'm sure they will eventually out grow the planters so I'll have to move them one day. Until then they are giving the porch a nice burst of color.


Privacy is even an issue on the front porch too. Living in a townhome community has its pros, but the biggest con is that you are surrounded by people and houses. To fix that I got this matchstick blind on the cheap from Garden Ridge and hung it for some added shade and a filtered privacy.


The pergola is on pause for the moment but we will be gearing up for more work on it this weekend. We have decided to stain it the same color as the front porch, so I will be on a ladder with gloves and a brush for quite some time... hopefully I'll survive.

6.15.2009

More Landscaping, really?!


Yes people, I have a problem (Step 1, check). I must always have dirty hands doing something around the house, most times I just make up things to do, but if I didn't then I would have nothing to write about. But this project was actually a necessity. When Erik and I moved into our townhouse our property line on the unattached side was marked with a DISGUSTING retaining wall. It was raw cinder block, 2 rows too short and just plain u-g-l-y. Of course our builder said he would complete it with stucco to match the foundation but I, thank goodness, didn't hold my breath because as he ran from finishing our development, our retaining wall hopes ran with him. Needless to say, we had to pick up his pieces and finish it on our own.

Here's what we had to start with:


{ Yikes, I know...}

First we tried masonry. Erik got more blocks and added the 2 rows we needed to make the wall level with the yard. 


{ So far, so good }


Then we found a beautiful Pennsylvania slate to top the wall with. However that didn't work so well. The mix of mortar must not have been correct and the stone fell off. Next we looked on Craigslist for an expert to stucco the wall for us. $600 dollars!!! No way my friend. Once again we were left with no affordable ideas.

Erik and his cute head came up with an idea. Paint the wall and put a BIG planter box on top to cover the top and add a place for some annual color. Genius, my man is. So I got an olive green paint to complement the house and painted the wall. Plus 3 BIG pieces of wood and lots of muscle = a long, long, BIG planter box. 


Which I stained the same color as the porch...


And added some amazing begonias to finish off the whole thing.


Here's the price breakdown:

Cinder blocks- free, found them :)
Mortar mix- $5
Paint- $15 (Wal-Mart baby)
Wood- $30
Potting Mix- $16
5 Begonias- $25

TOTAL: $91!!! Must better than the $600 Mr. Expert Stucco was going to charge.

It was definitely a labor of love, but worth it. Now I just need to add some plants to the bed in front of the wall and we are in business!

6.14.2009

Hostas Galore!

2 things thrive in my yard: hostas and lamb's ear. I have lamb's eye growing out of every stitch of dirt imaginable, and hostas have popped up all over the yard as well. I was happy to receive several of these little sprouts of hostas from my mother-in-law in early spring this year and last so the collection is quickly growing. But so far this summer they are growing uneven, and due to my OCD, I must have symmetry. So last week I remedied the situation by transplanting ALL of my hostas.

It went something like this...


{ Dig up all hostas }


    { Separate plantings by size }


{ Layout new plantings }


{ All evenly spaced ! }