7.21.2009

I (heart) 3M


Anything that makes life easier is a must for me. 3M is one of those wonderful companies that creates products that make my heart swoon. Their line of removable, yet very strong wall hooks and mounting velcro make hanging anything possible, anywhere. I use them in my classroom because our cinder block walls are near impossible to hang things from. But around the house I have even more uses for them. Besides who wants to move into a house full of holes?


{ Evenly spaced decorative mirrors that are easy to hang without measuring with 3M removable velcro, genius. }


{ The large hooks are perfect for holding heavy bathrobes, even with the moisture in the bathroom they stick like glue. }


{ Who wants to put holes in beautiful cabinets? Use the mini hooks to hold up your plastic bag caddy. Save space and recycle those bags! }


They also have a designer line of brushed silver, gold, bronze, and copper finishes for those that use them in a more visible location that needs some style! A simple solution and a must have.

*Note: This is not a paid advertisement, just a girl who is in love and likes to tell others about it.


7.16.2009

YHL Featured!


Thanks to Sherry and John over at Young House Love for featuring my jewelry board. Go see it here!

Hey Old Timer!


Photos are a must when decorating the home. I bet you can't stand in one single house without seeing a million picture frames full of memories. However it can get stale after a while. Lately turning pictures to black and white is the way to making them more interesting, or blowing them up large like I did with my wedding photos can help break the rut.


But Women's Health Magazine, yes a health magazine, gave a great way to amp up those pictures you have in ALL those frames: make 'em look old! All you have to do it visit this site (if it is in Japanese, click the English link in the top right corner to translate) and you can upload any of your pictures and it will convert them for you. A note: it works best with pictures that have medium tones- if you have a really sunny picture you'll want to up the contrast before or it will look very light and blown out. Here is an example of a picture I took of Erik when we went backpacking:


{ BEFORE }


{AFTER}


It definitely helps make your memories more unique and interesting. So load 'em up, convert 'em, and switch 'em out!

7.15.2009

Sneak Preview: Guest Room


{ The so drab BEFORE }

Busy (crazy) bee is at it again. As the school year approaches, I am in a scramble to get my To Do list for this summer complete. Next on the list was the guest room. When we moved in almost 3 years ago, it was one of the last rooms to get together. It has all hand-me-down furniture, a very bad, one coat of paint, and an ugly flush mount light fixture. So I decided that it needed an update. I gave myself strict guidelines:

1. No New Paint! I had to use left over paint from the many other paint projects. (Just like I did for the laundry room!)

2. Buy only the necessities. I purchased only artwork, curtains and a light fixture. Every else had to be repurposed from left overs from other re-dos.

3. I have to do it all by myself. If so, then husband doesn't get to gripe about another project (love you dear...).

Due to a little paint mishap that I'll elaborate on later, it is not 100% complete yet, but here is a little preview:


7.14.2009

New Vines a growing...


{ from here }


I adore the look of lush, green living accents to homes. An ivy covered wall, or a wisteria engulfed archway. Our little craftsman neighborhood is seriously lacking greenery. We are one of the lucky few who have a tree in the front yard, but I want more. I wanted to have a statement entry to our abode, so Erik finally agreed to let me grow one!


I purchased these amazing smelling Madison Jasmine vines a couple weeks ago. I have them planted and primed to climb up and cover two pillars that frame our front porch. They have done some serious sprouting due to a few good rains. I can't wait for the green accent to the porch! I'll keep you updated on the climb!

7.09.2009

Curtain How-To


Outdoor curtains are EXPENSIVE I have learned. Most run about $40-50 for a panel which, when I needed 4 for the deck, was out of the question. This is how it came to be that I make my own. That's usually how I end up doing most of the projects I do- I see what it costs to buy outright, I am astonished, I then make my own. Some people call it crafty, I say that I'm just cheap.

I searched online and found a site that sold outdoor fabric and found the white I wanted. (I'm not posting a link because I didn't have the best buying experience and I don't want others to have one either- use Google people!) I ordered 12 yards to make 4 panels that measured 88" after hems. I had to roll out the fabric on my bedroom floor to cut the panels. I added 6" (a 1/2" top and bottom flap, and 4" top seam, and 1" bottom seam) to the 88" for a total of 94" raw material. Then hemmed the top and bottom per the specs. Now why a 4" top seam you ask? Because I decided to use grommets to hang the curtains.

I found these awesome plastic grommets from Joann's that were perfect. Plastic so they wouldn't rust and there were a bunch of finishes to choose from. The directions said that a 4" seam worked best.


**Note: Always check specs for hardware before in case they ask for things like this!**

Next I measured out the placement for the grommets. With 6 per panel they worked out to be 7 1/2" apart. I then marked the center of the grommets and used the included stencil to make cutting guidelines. So easy!


Then I carefully cut out the centers and put the two plastic grommets one on top one on the bottom and they simply snapped together. The greatest grommets ever!


Once all the curtains were finished, Erik hung the 1" dowel rods, that I stained to match the porch, and I put up the new crisp, white panels. I also made tie-backs with extra fabric and tinier versions of the same grommets.


Now we have all the privacy we need, along with a cabana feel of the beach, nice.


Fresh Paint


{The BEFORE}


With the new pergola erected, curtains hung, and stain applied, the back french doors were looking washed out. Black paint to the rescue! A fresh coat of black helped the doors pop out from the warm brown stain and olive siding.


{The AFTER}


Another simple update to the Grubbs' house.

7.06.2009

Cutest Picture EVER


Ever since Jesse and Whitney over at Our Labor of Love shot our wedding I have been obsessed with them. They are truly astounding when it comes to capturing the tiniest and happiest moments in weddings, family portraits and engagement shoots.

As I was browsing their blog today I came across this image from one of their recent weddings and I couldn't help but smile. Hope you enjoy it too.


Happy Dance!


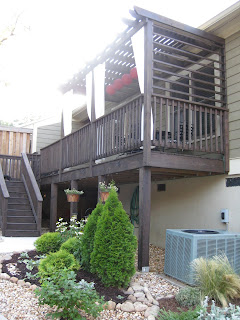
Here is our NEW and IMPROVED back porch with pergola in all its glory...


It has been a long labor of love that included 5 days of staining, 2 days of construction, 1 day of sewing and 1 day of landscaping. But it was all worth it when our 4th of July guests enjoyed the extra shade and comfy spot to eat and mingle.

I still would like to add some greenery on the porch and Erik hopes to get a couple benches made for extra seating. But all in all, it wasn't a difficult project, just a time consuming one. Remember what it looked like...

Before:


{ So hot and sunny...}


During:


All of it was necessary to achieve the amazing after:


Thank you to everyone who helped it all come together!!


I'll have an easy as pie tutorial to show you how I whipped up those awesome outdoor curtains so easily!

7.02.2009

Easy and Delicious Treats for the Heat

We have an extravaganza of a 4th of July party coming up this weekend with Lesley and Sam, our neighbors. It is forcasted to be a hot one of course, so I would really enjoy some of these cool refreshing treats. And with a prep time of 5 mins. and only two store bought ingredients, I'm sold!!!


Ingredients: strawberry ice cream, or any flavor that you prefer - crispy cookies, i.e. shortbread or even chocolate chip if you need some cocoa in the mix!

Directions: soften the ice cream and spoon onto cookie, sandwich a 2nd cookie and freeze. Seriously I can handle this!!


Go visit Real Simple for 11 more yummy summer treats!