7.29.2009

Must Have: JR Watkins


On one of my many trips to Target I stumbled upon this wonderful line of products. I am a sucker for packaging and this company wins hands down for best designs, but I also chose to purchase from their line because JR Watkins boasts that they are:

Committed to being America's most trusted natural products company, Watkins adheres strictly to the same quality standards set forth by its founder J.R. Watkins. J.R. Watkins Natural Apothecary line of personal care contains only natural, environmentally friendly ingredients from renewable resources, avoiding chemicals like parabens, sulfates, phthalates and more and is one of very few lines to be certified by the Natural Products Association.


I picked up their Aloe and Green Tea Hand soap, and I'm in love! The scent is subtle yet refreshing. I must admit that it is hard to stray away from Method, but change is always good once in a while. And with more and more choices when it comes to green product lines, the more we use them, the more likely that Clorox, and other harsh chemical cleaners, will leave the shelves for good!

7.28.2009

All the Little Things


Here's a final look at the details of the freshened up guest room...


{ the BEFORE }


{ A fun print purchased from Etsy }


{ Mirror- Target, Lamp shade- Ikea }


{ Vintage camping prints from Old School Stationers via Etsy }


{ Light, rug, curtains- Ikea }

Everything has finally come together. The only little thing left is to repaint the dresser and update hardware, but it's not a have-to-do-at-this-minute type of thing. So I'm taking a break from redecorating. I can't wait for the next guest to come and enjoy the room!


How-To: Applique Pillow


{ courtesy of designmilk.com }


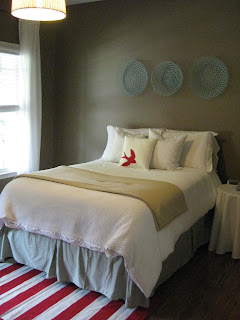
The guest room bed needed something red. The red striped rug was lonely. I wanted to incorporate red on to the bed, so I decided that a pillow was in the cards. I have been looking on Etsy and at various other sights, but adorable pillows like the one above are very pricey. Cheap-sake on alert! Make it myself I say!

I had some leftover fabric from the outdoor curtains I did for the back porch, so I whipped up a pillowcase. Next I search the web for a bird silhouette. I found this lovely and printed it out.


Then I traced it onto a piece of stiff felt. I chose the stiffened felt because it is easier to cut crisp lines on. Cutting out the bird is next.


To secure the applique to the fabric I used some fusible webbing- a nifty material that uses heat to bond fabric together.


Now that the bird was secured to the fabric I stitched it on with white thread, tracing around the edges. I must say it wasn't the best job, but it was my first time, no too bad.


After I closed the pillowcase, the red bird was reunited with it's bed mates. The pillows behind are actually just pillow inserts from other pillows I had lying around. They had ugly covers so I just took them out and put them on the bed. They have a more natural feel.


The bed now has its red pop and the rest of the room has come together nicely. Head to the next post to see the details!

7.24.2009

A Little Lovin'


I feel so honored to have been given a Blog Lovin' from Huma from Her Little Place. I have gained a lot of new viewers courtesy of my jewelry board debut and I'm so grateful that you all give a couple minutes of your day to see what ramblings I have come up with. In order to pay it forward I would like to pass on the love to some of my favorite reads:


Her southern livin', baby lovin' blog is too cute- plus she is a wonderful neighbor :)


Ashley @ Mrs. Boatman (if you're nasty :) )
An amazing sister who is so clever and completely understanding my crazy ways


We share a love for coil hoses and beautiful orange delights


Katja @ Nestled In
Her beautifully simple blog is so refreshing


Thanks Ladies! I enjoy giving you all my minutes every day!

Getting it Straight


Anyone who has a duvet has experienced this dilemma, guaranteed. You are so sleepy and ready to crash for the night, you hop in bed, get ready to pull the covers up and you grab... nothing. You reach for the comforter and you pull up a duvet cover. This is because your comforter inside has slipped down to the bottom of the duvet that hangs over the end of the bed. It is awful a lumpy bottom- that isn't good in any situation. Bed, Bath and Beyond to the rescue.


I found these life-saver clips at B,B & Y on the recommendation of my sister Becky. They clip the corners of the comforter and duvet cover together to ensure that they never do part, until the next wash.

So I took my comforter out of the cover, and put the cover in the washing machine for a good cleaning. When the dryer buzzed I popped it out, got my clips, and was ready to go... but, when I put my hand inside the duvet cover I discovered an amazing surprise: my West Elm duvet cover already came equipped with ties!!


Finally someone realized the heartache! I went through all the tugging and pulling daily to find out that I had the solution the whole time. I never wanted another duvet because of this problem, but duvets seem to be the only stylish solutions to bedding these days. They don't make cute comforters unless you are 12. And when I fell in love with my organic cotton pin-tuck duvet I had to have it, little did I know that it was a smart duvet!


So I turned the cover inside out, tied the comforter in, flipped it through and was good to go! Thank you West Elm for being REALISTIC, and making my life much EASIER. It's the only way to go.


*Note: the clips were not returned, they have found a lovely new home with Lesley, next door- sadly Dwell has not jumped on the tie bandwagon. No one's perfect, right?

Sweet Dreams

7.22.2009

How-To: Cleaning Your Ceiling Fan


{ Tools of the Trade: Swiffer, Pillow Case }

How does dust collect on a moving surface? I have never understood how ceiling fan blades get so dusty, especially ours since it is always running. Well, somehow it does collect, and ours needed cleaning. I have used many methods to banish the fuzzy stuff: a swiffer, vaccum attachments, and a damp wash cloth. All of these strategies worked, but not as good as the latest way I have just discovered (maybe you already knew, but I am slow sometimes so it's just getting to me) A pillow case! Say what?! Yes, the bed linens make a lovely pocket to catch all those little, height-lovin' bunnies. Here's my breakdown:


Pillow Case Dusting

1. Observe nasty fan blades... gross.


2. Place pillow case (I wouldn't use a white one, just in case) over fan blade, up to the bracket.


3. Using one hand pull pillow case snug around the blade. Then with the other hand pull the pillow case down the blade.


4. Catch any leftovers with a Swiffer duster.


And hello gorgeous!


Total time: 5 minutes
Cost: $0!
Benefits: A less sneezy husband.


Have any cleaning questions? Send me a shout!

7.21.2009

Guest Room Update


The Guest Room redo is still rolling but I wanted to give you another peak.


The To Do List still includes: refinishing the existing dressers, re-covering a lamp shade, and making some decorative pillows with punches of red for the bed. But it has come a long way from what it looked like when we first moved in:


The golden paint color was a leftover color from the previous house. I switched it for a warmer brown. The curtains were updated with higher hung Vivian curtains from Ikea. And the boring flush mount light was replaced with the more natural textured fixture, also from Ikea. I'll have more on the other details that were added including a How-To on the pillows I'm working on.

But what do you think of the changes so far?

I (heart) 3M


Anything that makes life easier is a must for me. 3M is one of those wonderful companies that creates products that make my heart swoon. Their line of removable, yet very strong wall hooks and mounting velcro make hanging anything possible, anywhere. I use them in my classroom because our cinder block walls are near impossible to hang things from. But around the house I have even more uses for them. Besides who wants to move into a house full of holes?


{ Evenly spaced decorative mirrors that are easy to hang without measuring with 3M removable velcro, genius. }


{ The large hooks are perfect for holding heavy bathrobes, even with the moisture in the bathroom they stick like glue. }


{ Who wants to put holes in beautiful cabinets? Use the mini hooks to hold up your plastic bag caddy. Save space and recycle those bags! }


They also have a designer line of brushed silver, gold, bronze, and copper finishes for those that use them in a more visible location that needs some style! A simple solution and a must have.

*Note: This is not a paid advertisement, just a girl who is in love and likes to tell others about it.


7.16.2009

YHL Featured!


Thanks to Sherry and John over at Young House Love for featuring my jewelry board. Go see it here!

Hey Old Timer!


Photos are a must when decorating the home. I bet you can't stand in one single house without seeing a million picture frames full of memories. However it can get stale after a while. Lately turning pictures to black and white is the way to making them more interesting, or blowing them up large like I did with my wedding photos can help break the rut.


But Women's Health Magazine, yes a health magazine, gave a great way to amp up those pictures you have in ALL those frames: make 'em look old! All you have to do it visit this site (if it is in Japanese, click the English link in the top right corner to translate) and you can upload any of your pictures and it will convert them for you. A note: it works best with pictures that have medium tones- if you have a really sunny picture you'll want to up the contrast before or it will look very light and blown out. Here is an example of a picture I took of Erik when we went backpacking:


{ BEFORE }


{AFTER}


It definitely helps make your memories more unique and interesting. So load 'em up, convert 'em, and switch 'em out!

7.15.2009

Sneak Preview: Guest Room


{ The so drab BEFORE }

Busy (crazy) bee is at it again. As the school year approaches, I am in a scramble to get my To Do list for this summer complete. Next on the list was the guest room. When we moved in almost 3 years ago, it was one of the last rooms to get together. It has all hand-me-down furniture, a very bad, one coat of paint, and an ugly flush mount light fixture. So I decided that it needed an update. I gave myself strict guidelines:

1. No New Paint! I had to use left over paint from the many other paint projects. (Just like I did for the laundry room!)

2. Buy only the necessities. I purchased only artwork, curtains and a light fixture. Every else had to be repurposed from left overs from other re-dos.

3. I have to do it all by myself. If so, then husband doesn't get to gripe about another project (love you dear...).

Due to a little paint mishap that I'll elaborate on later, it is not 100% complete yet, but here is a little preview:


7.14.2009

New Vines a growing...


{ from here }


I adore the look of lush, green living accents to homes. An ivy covered wall, or a wisteria engulfed archway. Our little craftsman neighborhood is seriously lacking greenery. We are one of the lucky few who have a tree in the front yard, but I want more. I wanted to have a statement entry to our abode, so Erik finally agreed to let me grow one!


I purchased these amazing smelling Madison Jasmine vines a couple weeks ago. I have them planted and primed to climb up and cover two pillars that frame our front porch. They have done some serious sprouting due to a few good rains. I can't wait for the green accent to the porch! I'll keep you updated on the climb!

7.09.2009

Curtain How-To


Outdoor curtains are EXPENSIVE I have learned. Most run about $40-50 for a panel which, when I needed 4 for the deck, was out of the question. This is how it came to be that I make my own. That's usually how I end up doing most of the projects I do- I see what it costs to buy outright, I am astonished, I then make my own. Some people call it crafty, I say that I'm just cheap.

I searched online and found a site that sold outdoor fabric and found the white I wanted. (I'm not posting a link because I didn't have the best buying experience and I don't want others to have one either- use Google people!) I ordered 12 yards to make 4 panels that measured 88" after hems. I had to roll out the fabric on my bedroom floor to cut the panels. I added 6" (a 1/2" top and bottom flap, and 4" top seam, and 1" bottom seam) to the 88" for a total of 94" raw material. Then hemmed the top and bottom per the specs. Now why a 4" top seam you ask? Because I decided to use grommets to hang the curtains.

I found these awesome plastic grommets from Joann's that were perfect. Plastic so they wouldn't rust and there were a bunch of finishes to choose from. The directions said that a 4" seam worked best.


**Note: Always check specs for hardware before in case they ask for things like this!**

Next I measured out the placement for the grommets. With 6 per panel they worked out to be 7 1/2" apart. I then marked the center of the grommets and used the included stencil to make cutting guidelines. So easy!


Then I carefully cut out the centers and put the two plastic grommets one on top one on the bottom and they simply snapped together. The greatest grommets ever!


Once all the curtains were finished, Erik hung the 1" dowel rods, that I stained to match the porch, and I put up the new crisp, white panels. I also made tie-backs with extra fabric and tinier versions of the same grommets.


Now we have all the privacy we need, along with a cabana feel of the beach, nice.