

7.09.2009


7.06.2009
Cutest Picture EVER

As I was browsing their blog today I came across this image from one of their recent weddings and I couldn't help but smile. Hope you enjoy it too.

Happy Dance!


It has been a long labor of love that included 5 days of staining, 2 days of construction, 1 day of sewing and 1 day of landscaping. But it was all worth it when our 4th of July guests enjoyed the extra shade and comfy spot to eat and mingle.
I still would like to add some greenery on the porch and Erik hopes to get a couple benches made for extra seating. But all in all, it wasn't a difficult project, just a time consuming one. Remember what it looked like...
Before:

{ So hot and sunny...}
During:


All of it was necessary to achieve the amazing after:
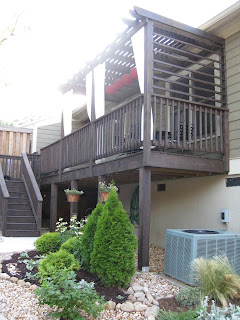
Thank you to everyone who helped it all come together!!
I'll have an easy as pie tutorial to show you how I whipped up those awesome outdoor curtains so easily!
7.02.2009
Easy and Delicious Treats for the Heat
We have an extravaganza of a 4th of July party coming up this weekend with Lesley and Sam, our neighbors. It is forcasted to be a hot one of course, so I would really enjoy some of these cool refreshing treats. And with a prep time of 5 mins. and only two store bought ingredients, I'm sold!!!


Ingredients: strawberry ice cream, or any flavor that you prefer - crispy cookies, i.e. shortbread or even chocolate chip if you need some cocoa in the mix!
Directions: soften the ice cream and spoon onto cookie, sandwich a 2nd cookie and freeze. Seriously I can handle this!!
Go visit Real Simple for 11 more yummy summer treats!
6.30.2009
Lazy in the Woods


I am still working on MANY projects 'round here. I hope to have finished pictures soon!
6.23.2009
Progress on the Home-Back

{NO MORE projects, PLEASE! }

I started by staining all the new wood since it was already nice and clean.

Today Anita (mom-in-law) came over with her trusty pressure washer. So I went to town on getting the grime of the old wood to prep for stain. While I did that, she worked on staining the top planks for the pergola. It will be easier to stain them now, instead of trying to reach all the nooks when they are already installed.

{ I love this stain color, Oxford Brown by Behr. It looks worn and weathered, perfect.}
By about 4p we were spent and ready to go inside and enjoy the AC. I'm sure I'll have a brush back in my hand very soon- but I'm taking the day off tomorrow.
6.20.2009
Simple Update

I must share my favorite tool when it comes to yard work: THE COIL HOSE! It is amazing, especially since we have to drape our hose over a railing to reach all of our plants. The standard hose just kept getting tangled and would break the limbs of a hydrangea near by. Target to the rescue! We got a 50' hose with a multi-head sprayer for $19.99!
But I was using a nasty old plastic pot to hold the old hose. A score from my mother-in-law- a coil basket, for free!!- was a must have. I spray painted it white because it already had some paint drips on it.


And now my new lovely hose has a lovely house to match!

Yay for easy, free fixes!
6.19.2009
Growing Away

It's going to be a scorcher here in GA today, 97 degrees! I hope all these new blooms can take it!


Can you tell I like white flowers?
6.18.2009
Striped and Clean

Project # 1,934,235,001- our laundry nook. You've already seen how I updated the bi-fold doors that hide it, but it was time to refresh the inside too. I wanted to make this as budget friendly as possible so I made use of lots of leftover paint that I had on hand. There was 3/4 gallon of Glidden's First Anniversary (a warm golden yellow) and an almost full Quart of white paint. The decision was to do stripes! I have never done them but after I saw Sherry and John's bathroom makeover I was convinced. So I used the golden yellow for the darker stripe, and then mixed in the white to make the contrasting lighter stripe. Here's how it went down...
Step 1: Take everything out! (Except the washer and dryer! I had to maneuver my way around them since Erik aka 'the muscle' was at work)
Step 2: Decide how big to make your stripes. I went with 14.5' stripes, which worked out to be 7 stripes. Then choose which to paint first, dark or light. I went with dark so I taped out the darker stripes. And rolled away.

Step 3: Buy more tape! Once I finished the dark stripes I had to head to Wal-mart real fast like, and snag some more blue tape. Then I mixed the white paint into the can of golden yellow to make the lighter shade. When I taped out the lighter stripe, I overlapped the darker stripes a bit to ensure that the seams where clean.

Step 4: Remove tape ASAP! Remove the tape when the paint is still wet to make sure that there is no peeling. Then I added a small shelf under the existing one for easy, short-person reaching, and some cup hooks to hang brooms and mops.


Now I'm a little happier to do the laundry, but not much.
Project Breakdown:
Paint- free!
Painting supplies- $12
Shelf- free, from an existing cabinet
Shelf brackets- $3
Cup hooks- already had 'em
TOTAL: $15 !!
Etsy Score: Dazey Chic

As the summer continues on, so do the projects. The guest room is next. It is the only room in our house that is still a mis-mash of things. I rushed to get it painted (only 1 bad coat!) and accessorized for our house warming party 3 years ago. With all the other amazing transformations happening around the house, I thought I might as well tackle it too.
So as I am thinking of paint colors, furniture arrangements, etc. I decided to check out Etsy for some original, handmade artwork for the walls. Most of the art in our home is my work, but I really liked the humor of Dazey Chic's work. I just ordered this hilarious print for the guest room:

It should make any visitor smile.
More details for the guest room make-over, and pictures of my latest make-over NEXT!
Subscribe to:
Posts (Atom)